6.1. OwnCloud, A File Synchronization and Cloud Service
This Internet app uses a data container, dnsmasq, MariaDB, Nginx, OpenLDAP and Postfix.
Owncloud is a free, open source, Dropbox-like file synchronization and cloud service.
6.1.1. Configure DNS
Add an A record to point the domain that you want to use with ownCloud to the IP address of the server.
6.1.2. Configure the MariaDB Database
Follow the instructions in Create a New Database and User in MariaDB to create a new user and a database both named as
owncloud in the MariaDB database.
6.1.3. Set up OwnCloud Container
Create a data container for ownCloud:
docker run -v /var/www/html --name owncloud-data busybox /bin/true
To start the ownCloud container, run the following command:
docker run -d --restart always --name owncloud --dns $HOST_ADDR \
 --add-host smtp-server:$HOST_ADDR --volumes-from owncloud-data blober/owncloud
The Dockerfile from which the image was generated is available. For the first time the container starts, it will download and
decompress the ownCloud installation to /var/www/html/.
6.1.4. Configure Nginx
Now run the following command to set up Nginx, after replacing owncloud.example.com with the domain to be used by
ownCloud:
cd $DOCKER_SHARE/nginx
OWNCLOUD_URL='owncloud.example.com'
sudo -s <<EOF
sed -e "s/@server_name@/$OWNCLOUD_URL/g" redirect-https.conf.tmpl > owncloud.conf
sed -e "s/@server_name@/$OWNCLOUD_URL/g" \
 -e 's/@web_server@/owncloud:80/g' reverse-proxy.tls.conf.tmpl > owncloud.tls.conf
EOF
Optionally we can edit owncloud.tls.conf to use a different TLS/SSL key instead of the dummy key.
Recreate and restart the Nginx container:
docker restart nginx
6.1.5. Basic Configuration of OwnCloud
Visit the ownCloud instance in a browser (e.g. https://owncloud.example.com), and follow the instructions to set up
ownCloud. In the first-run setup page, the database type should be MySQL/MariaDB not SQLite; the database server
is db; database login is owncloud; the database password is the one we generated earlier; the database name is
owncloud. The settings should look like Fig. 6.1.1. Then click Finish setup to finish the initial
setup.
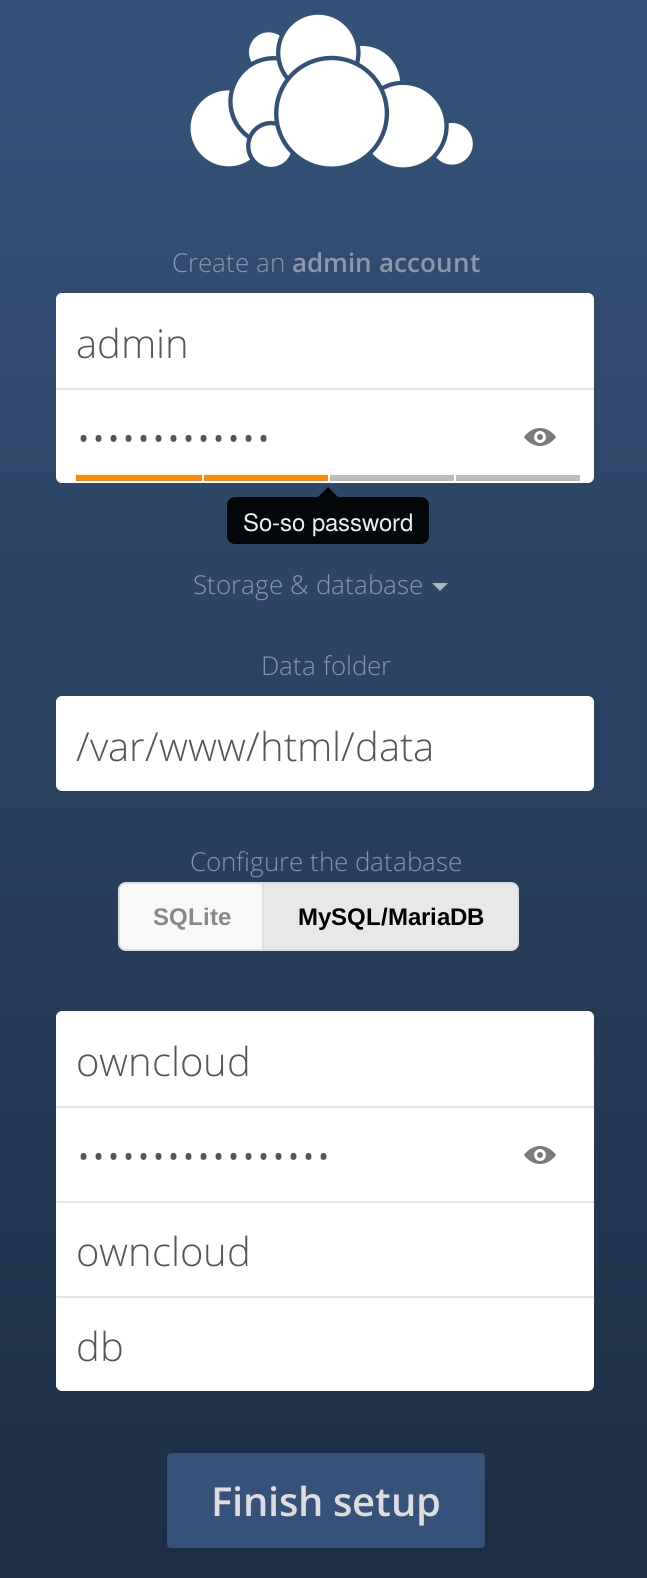
Fig. 6.1.1 Set up ownCloud in the first run.
We should have now automatically logged into the admin account. Then we need to configure the email server for sending notification. Click on the triangle on the right up corner, and click “Admin”, as shown in Fig. 6.1.2. This should lead us to the admin interface.
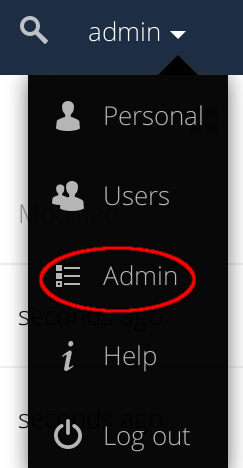
Fig. 6.1.2 Enter the admin interface.
In the admin interface, there is an “Email Server” section. In this section, Send mode should be set to smtp;
From address can be anything you like, such as owncloud@example.com; Server address should be set to
smtp-server. The settings should look similar to Fig. 6.1.3.
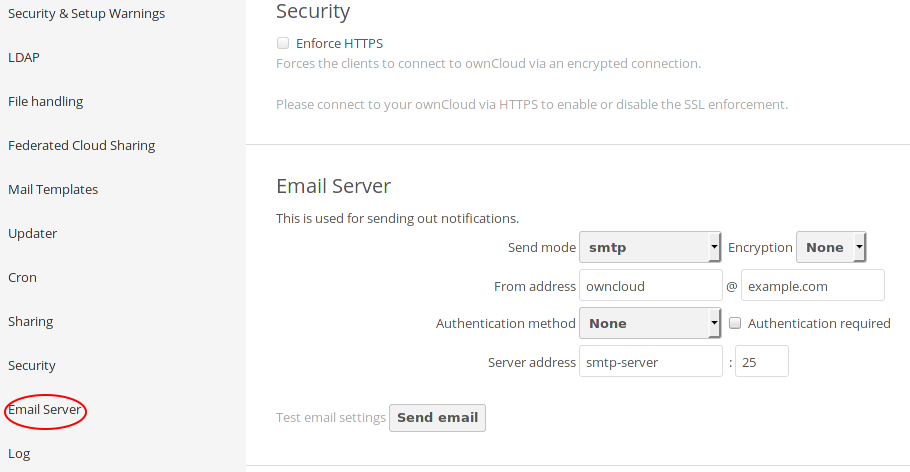
Fig. 6.1.3 Set the email server.
Since we use reverse proxy for the ownCloud setup, we also need to configure ownCloud to recognize the reverse proxy by
running the following command on the host system (after replacing owncloud.example.com with the domain used by the
ownCloud instance):
docker exec -i owncloud bash -c 'cat >>/var/www/html/config/config.php' <<'EOF'
# reverse proxy settings
$CONFIG = array_merge($CONFIG, array (
"overwritehost"     => "owncloud.example.com",
"overwriteprotocol" => "https",
));
EOF
6.1.6. Use OwnCloud with OpenLDAP
It is optional but recommended to use ownCloud with OpenLDAP. If you decide not to use ownCloud with OpenLDAP, you may skip this part.
First, follow the instructions in Common Group Related Tasks in the OpenLDAP Database to create a new group owncloud and add
all users who will be granted to use ownCloud to this group.
Now log in ownCloud with the admin account. On the left up corner, click on the small triangle next to the word “Files”, then click “Apps”, as shown in Fig. 6.1.4.
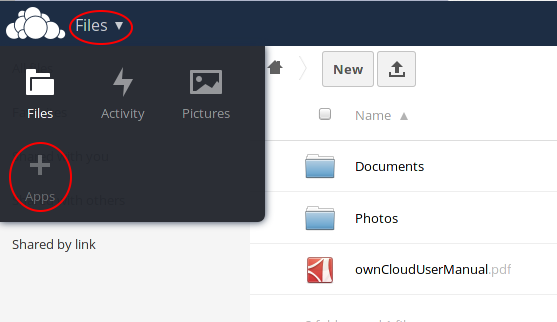
Fig. 6.1.4 Enter “Apps” in ownCloud.
We should be in the “Apps” interface now. Click on “Not Enabled” on the left, and find “LDAP user and group backend” on the right panel. Click on the “Enable” button to enable this LDAP backend ownCloud app, as shown in Fig. 6.1.5.
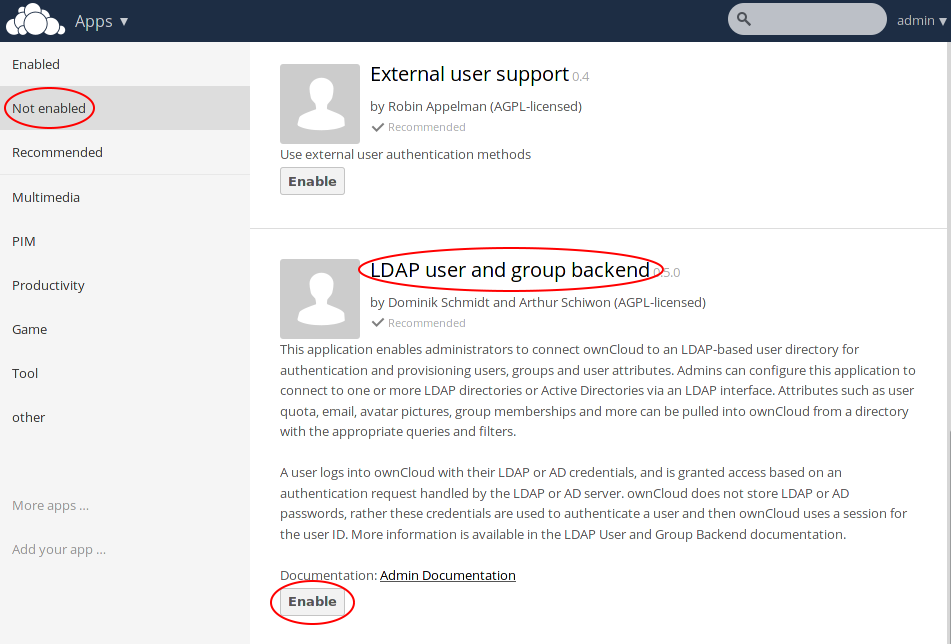
Fig. 6.1.5 Enable the LDAP backend app.
Enter the admin interface as shown in Fig. 6.1.2.
In the admin interface, we are going to set up the LDAP server. In the “Server” tab, fill in the host field with
ldap, Base DN field with $LDAP_SUFFIX, where $LDAP_SUFFIX should be replaced by the $LDAP_SUFFIX
used in Install OpenLDAP. User DN and Password should be left empty. The setup should
look like Fig. 6.1.6.
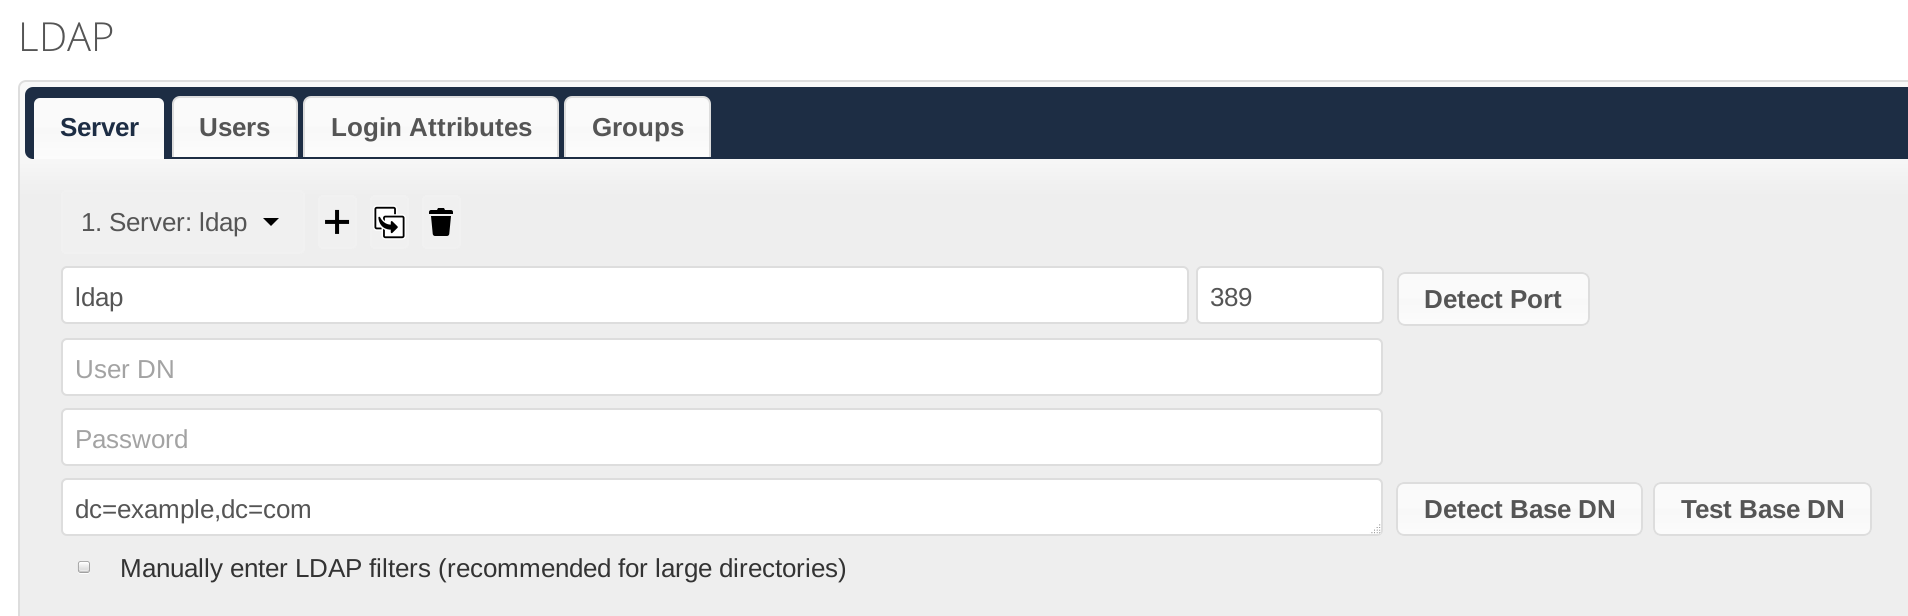
Fig. 6.1.6 Fill in the “Server” tab in LDAP settings panel.
Fill in the “Users” tab as in Fig. 6.1.7 and the “Login Attributes” tab as in Fig. 6.1.8.
In the “Login Attributes” tab, we may also add some other attributes as the user login. In the “Advanced” tab, the
User Display Name Field and Group Display Name Field should be set to cn under “Directory Settings”, as
shown in Fig. 6.1.9. Other tabs can be left as default.
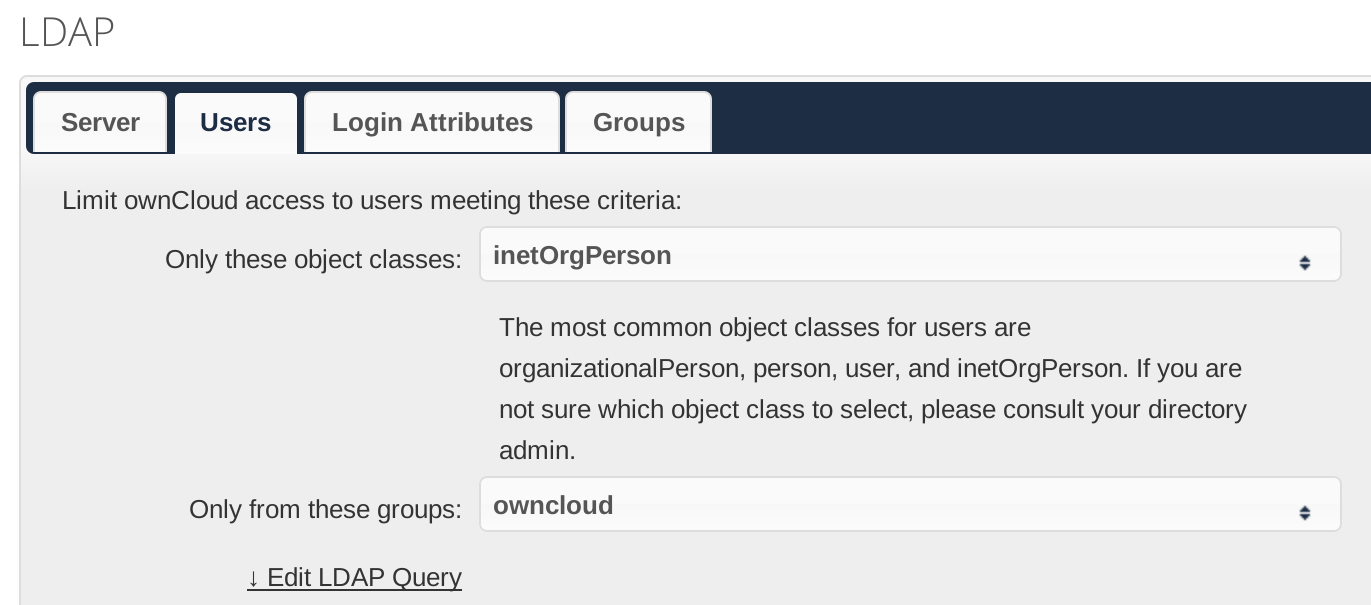
Fig. 6.1.7 Fill in the “Users” tab in LDAP settings panel.
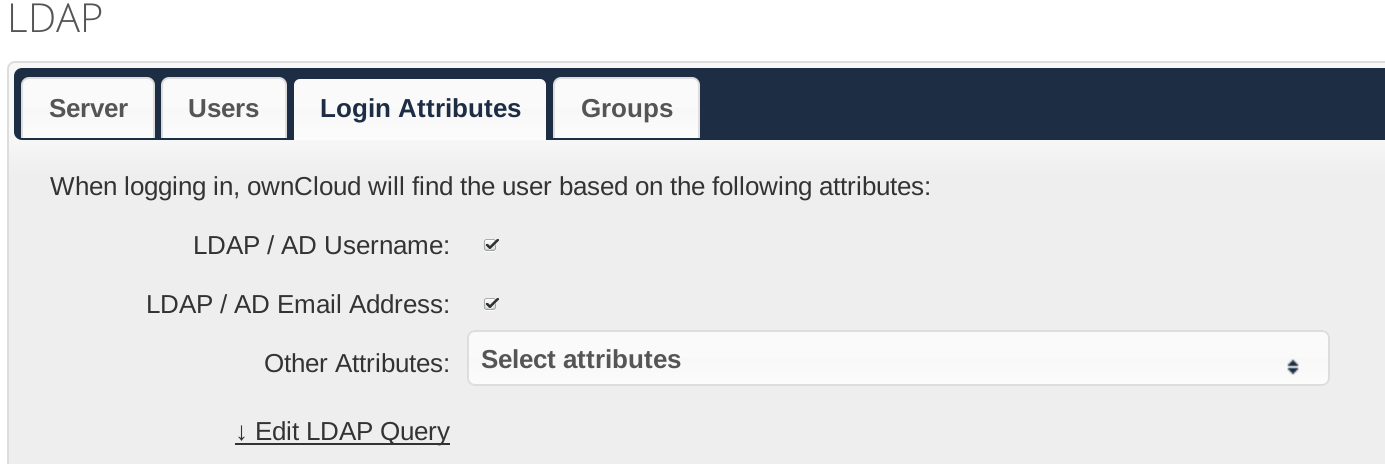
Fig. 6.1.8 Fill in the “Login Attributes” tab in LDAP settings panel.
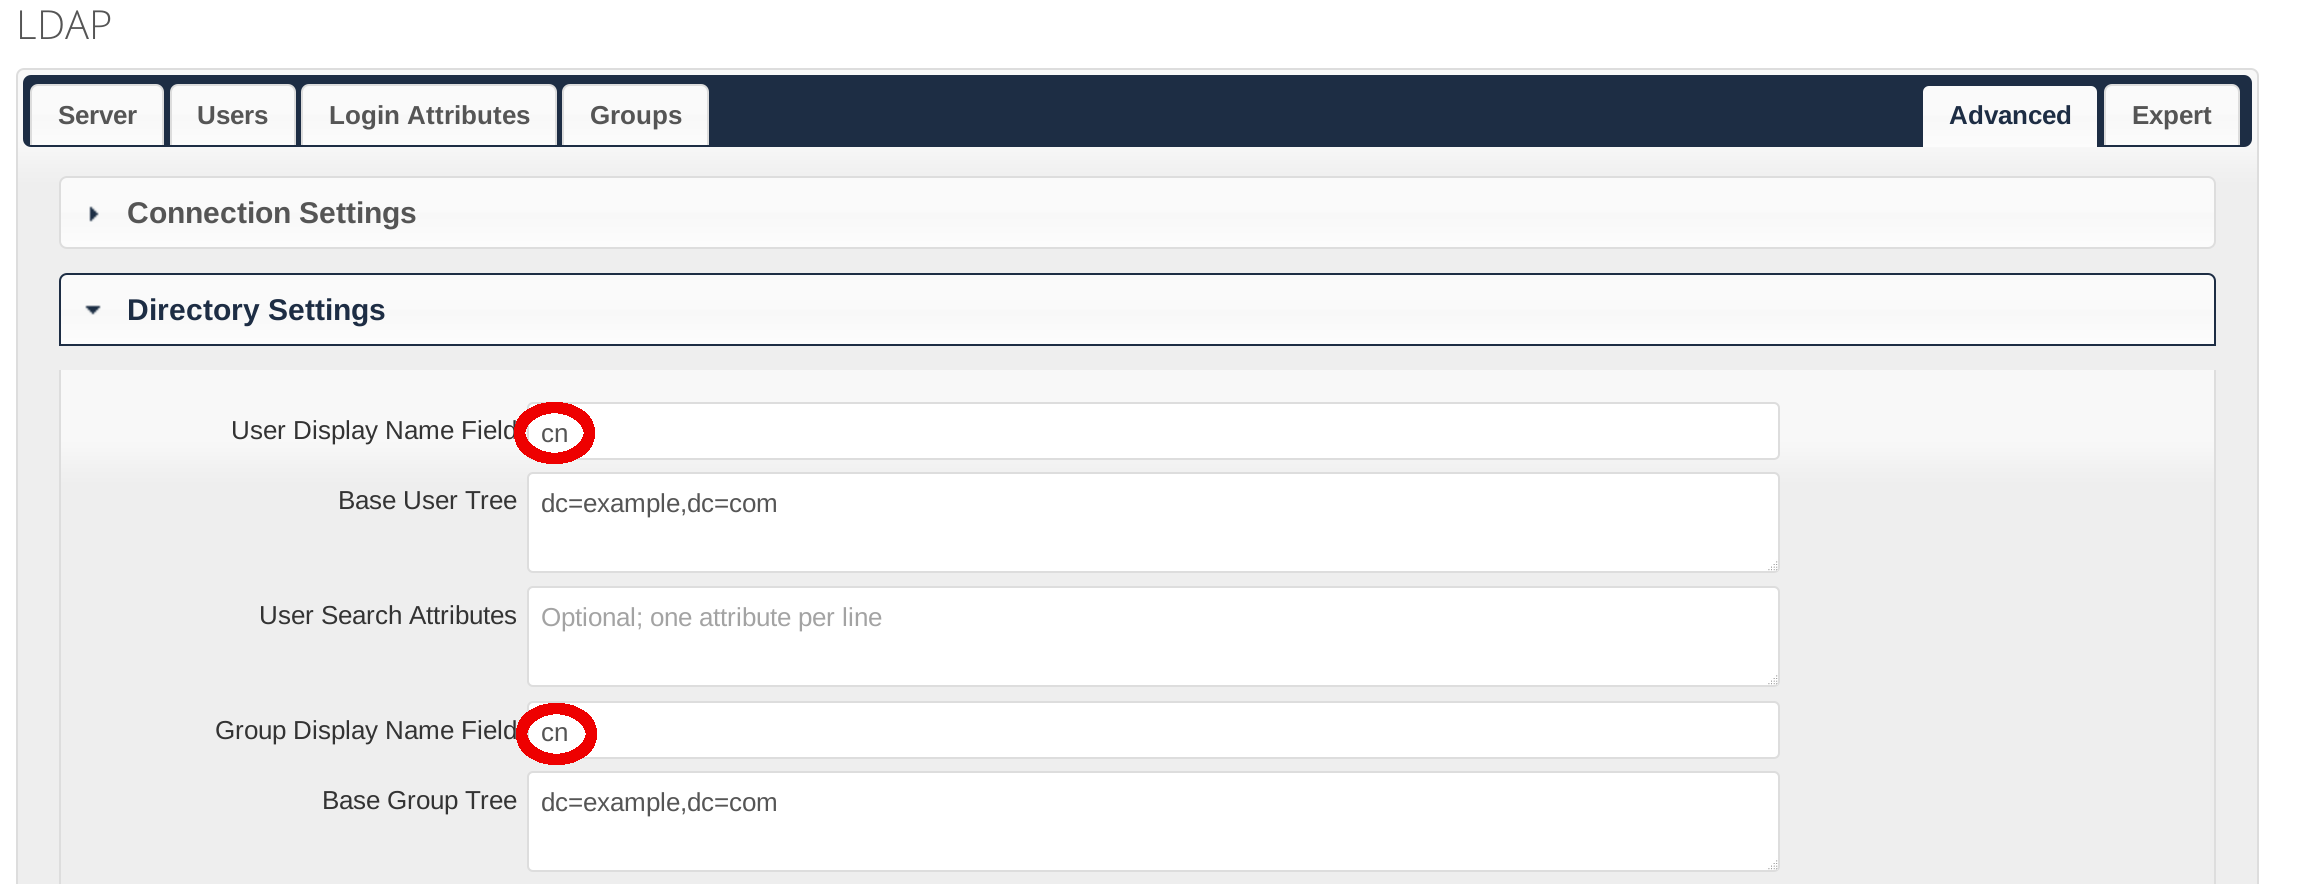
Fig. 6.1.9 Set the LDAP “User Display Name” and “Group Display Name”.
6.1.7. Other Settings
We may adjust settings and enable more ownCloud apps. The way to add a new app into the ownCloud instance is similar to adding the LDAP backend app as shown in Use OwnCloud with OpenLDAP. It is recommended to enable the Calendar and Contacts apps calendar and contacts synchronization.
6.1.8. Update OwnCloud
The ownCloud container used here is a self-managed php container, which means that all ownCloud files are downloaded and stored in a data container during the ownCloud container’s first run. To upgrade, we can use ownCloud’s Updater app.
To manually update ownCloud, run the following command to enter the shell in the ownCloud container then switch to
/var/www/html:
ne owncloud
# Now in the owncloud container
cd /var/www/html
Then follow the official instructions by ownCloud to update.